Sunday, December 30, 2012

My Daddy's Delicious Divinity

One of my favorite candies in the whole wide world is my Daddy’s Divinity. It tastes like a little touch of heaven. So delicious, my mouth is watering thinking about those little white clouds melting in my mouth. Well, I’ve had other divinity and it tastes nothing like the perfection my Daddy has made for years. I needed to get in on this little secret. How appropriate that this is my first blog for 2013! This Christmas I had the pleasure of learning how to make divinity with my Daddy. He gave me a candy thermometer and the recipe years ago, but I’ve been scared to try it on my own. I didn’t know what hard ball and soft ball stage means.....well, I do now! Paula Deen tried to teach me, but there’s nothing like being in the kitchen with your Daddy making your favorite candy. He is the best baker in the world, so after this lesson I’m certain I can make this on my own now. I’ll be sure to come back and let you know how my first solo effort goes, but for now, here’s the lesson from my Daddy. It was a lot easier than I thought it would be too. Don’t be afraid, you can do it too. Before we get started, take a look at how old this recipe of my Dad's is. As you can see, this recipe has been around a while.
Let’s get started with these 3 easy steps.
1.  Stir 2 cups sugar into ½ cup corn syrup, ½ cup water, dash salt till dissolved.  Boil to  medium-ball stage (240 degrees).


 Slowly pour 1/3 of sugar mixture over 2 stiff-beaten egg whites, beating constantly while pouring. This is when a stand mixer comes in handy.


That's my sweet Daddy
2. Cook remaining syrup to very hard-ball stage (265 degrees). Test: Add several drops to water.  Mixture will form a firm ribbon that bends when lifted from water. Beat syrup in candy mixture, continue beating until firm.


3.  When mixture holds its shape when dropped from a spoon, add 1    teaspoon vanilla. At this point, we added 1/2 cup of chopped pecans.


Drop from teaspoon onto a greased cookie sheet. Swirl each piece to a peak. Daddy could make a swirl, I just make a pile. We use two teaspoons to help spoon the mixture onto the wax paper or cookie sheet.


Double cooking takes longer, but it’s a failure proof way to make fluffy divinity. Let the divinity to dry fully, takes a couple of hours, then it is ready to enjoy!

Tip: did you know you shouldn't make divinity on rainy or humid days?? Yep, learned that from my Daddy and he's the expert!

Sunday, December 23, 2012

Crockpot Chocolate Candy - Yes, it's true!


Yes, this is actual delicious chocolate candy that is made in the crockpot! I know this is going to sound crazy, but just keep reading.  Don’t give up on it just yet. It was so easy and so delicious! Who knew you could make yummy candy in the crockpot?? I had no idea until my friend, Trisha Yearwood, taught me how. Thank goodness I still have time to watch the Food Network! I was watching her show last weekend and she made this candy with a friend of hers (not me, another friend) and I immediately ran out to buy the ingredients and give it a try. I also had never heard of almond bark, but what the heck, Trisha said to buy it so I did! Are you dying to know how to make it now?? I think you are. Okay, here’s the recipe: 

Ingredients:

2 pounds salted dry-roasted peanuts (this seemed like a lot of nuts so I might cut it back next time and mix it up with pecans). You could also just use whatever type of nut floats your boat.

4 ounces German's sweet chocolate (about 4 squares)

One 12-ounce package semisweet chocolate chips (about 2 cups)

2 1/2 pounds white almond bark


Directions:


Put the peanuts in the bottom of a 4-quart slow cooker. Layer the chocolate over the peanuts, beginning with the sweet chocolate, followed by the chocolate chips and then the almond bark. Set the temperature on low and cook for 3 hours. Do not stir the mixture. Tip: you might want to use a crockpot liner so you don’t have a chocolaty mess to clean up afterwards.


After 3 hours*, stir the mixture with a wooden spoon until smooth. Drop the candy into cupcake pan liners using about 2 tablespoons per liner. Allow the candy to cool completely before removing the cupcake liners.  *Now here is a disclaimer – I read several reviews of this recipe online and many said the nuts burned in their crockpot. Mine was perfectly fine, but maybe check after 1 ½ hours to 2 hours to make sure. If it’s all melted and you can stir it, go ahead and serve it up!
Mix well and get all the nuts covered in that yummy chocolate.


Here are some ideas I’m going to add next time too…..I think I’ll stick a caramel square in the cupcake liners and spoon the chocolate around it. That would be a yummy turtle treat! I also might get some peppermint candy to sprinkle on top after I scoop it out so it will be pretty. And lastly I was even thinking of putting a small York peppermint patty in the bottom of the liner and scooping the chocolate on top. Now that would be over the top!! So many ways to mix this recipe up.


Doesn't that look yummy?? As you can see, it is a lot of nuts, not that it's a bad thing, but I might cut it back next time.

These make such nice gifts and treats for your friends and they think you went to so much trouble, but it was really sooooo easy. Shhhhh…..that will be our little secret. I used Christmas cupcake liners and wrapped a couple up in cute paper and gave as gifts. Doesn’t it look cute? you could use mini liners and make so many more!  I think anyone would love to receive this treat, or just enjoy them yourself, but I must warn you…..this makes about 50-60 pieces. Add almond bark to your shopping list and make some now!


Merry Christmas!

Tuesday, December 18, 2012

New School Sausage Balls

Okay, this is another one of those recipes where you think.....got it, already make it, don’t need it. Well, if you’re thinking that, you’d be wrong. You’ve most likely had the sausage balls made the old fashion way, with raw sausage, tons of Bisquick, water and cheese. Well, this has most of the same ingredients, but you cook the sausage first! I know, I was skeptical at first because that’s not the way I’ve made sausage balls all my life, but my cousin, Lori, showed me the light and I’ve been making them this way ever since. I hate to admit it, but Lori was right. They are so much tastier. Plus you can really adjust the amount of Bisquick to make them cheesier.  The more cheese the better is our motto around here! Okay, here’s what you do for new school sausage balls.
Ingredients:
One pound of sausage. I like to use hot to give it a little kick.
4 cups of grated cheddar cheese
10 – 20 ounces of Bisquick
Directions:
Cook sausage until done, do not drain. I know, you are thinking ICK, but it’s okay, just add the cheese and melt it on top of the sausage, grease and all! You’ll be fine. It’s just a little bit. You won’t die. Trust me. Remove from heat when you add the cheese. Stir cheese in until melted.
Now add the Bisquick a little at a time. I probably never use more than 2 cups of Bisquick because I like them really cheesy.
Bake at 375 for 12 – 15 minutes.
These are the tastiest little morsels you will put in your mouth. Bake Christmas morning and everyone will love you!

Sunday, December 16, 2012

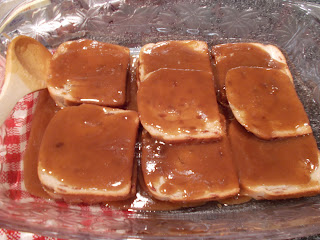
THE BEST French Toast Casserole EVER!


How's that for a title?? Catch your eye?? If the title didn't, that yummy picture should!

I have a Christmas Brunch every year for my girlfriends and love to put on a spread. One of the yearly favorites is my French Toast Casserole. It is to die for! Now you might be thinking that you’ve had a good French Toast Casserole and don’t need this recipe, but you’d be wrong! I’ve tried many other recipes, but this one is awesome! Trust me, try it and you won’t go back to your sad little recipe ever again. It will rock your world! You make it the night before so for 12 hours it’s just bathing in goodness, waiting to be cooked, and that makes all the difference. Are you tired of me going on and on about it??? Okay, fine, here’s the recipe:
Ingredients:
1 Pepperidge Farm Cinnamon Swirl Bread (w/without raisins)
3 Tbsp light Karo syrup
1/2 lb butter
1.5 cups brown sugar
5 eggs
1.5 cups milk
1 Tablespoon vanilla
1/4 teaspoon salt
Directions:
Combine Karo, butter, brown sugar in saucepan and melt.
Pour 1/2 of the mix in a  13 x 9 dish
Place 2 layers of bread on top
Pour the other 1/2 Karo mix on top
Beat eggs, milk, vanilla & salt in medium bowl. Pour over bread, cover & refrigerate over night.
The next morning, take casserole out of the fridge and bake  at 350 degrees for 1hour.
I know you hear me say that my recipes are awesome a lot, but seriously, this French Toast is the bomb! You'll love it!! BTW, one of my best girlfriends, Kerryanne, gave me this recipe many years ago. It's been making happy bellies ever since.
Enjoy!

Wednesday, December 12, 2012

Slow cooker Tomato Basil Parmesan Soup


If you know me, you know one thing I love is Tomato Basil Soup! I haven't found a great one to make, but Panera makes a mighty fine one for me to eat. They serve it with a warm whole wheat baguette and I'm in heaven. Oh, or Nordstrom's Cafe'. They have a delicious Tomato soup served with little cheese crostinis, but you have to ask for more than one. They are stingy with their crostini. Okay I'll try to snap out of it and get back to MY delicious recipe......I've been looking for a good tomato soup recipe and I believe I've found it. And who doesn't want a soup that cooks in the crock pot?? No watching and stirring and hoping it doesn't burn. Just dump it all in and come back in a few hours. Now that's my kind of soup! And it's tomato soup, my absolute fav!

Okay, let's see if this sounds yummy to you too....
Ingredients:

2 (14 oz) cans diced tomatoes, with juice (I used the cans with oregano and basil included)
1 cup finely diced celery
1 cup finely diced carrots
1 cup finely diced onions
1 tsp dried oregano or 1 T fresh oregano
1 T dried basil or 1/4 cup fresh basil
4 cups chicken broth (homemade if you have it, which of course I did) 1 bay leaf
½ cup flour
1 cup Parmesan cheese
½ cup butter
2 cups half and half, warmed (or skim milk if you’re trying to cut some calories. I split the difference and used one cup half and half and one cup skim milk)
1 tsp salt
¼ tsp black pepper
Makes about 2 quarts (about 8 servings)

1. Add tomatoes, celery, carrots, chicken broth, onions, oregano, basil, and bay leaf to a large slow cooker.


2. Cover and cook on LOW for 5-7 hours, until flavors are blended and vegetables are soft.

3. After veggies are soft enough, remove bay leave and emulsify with a hand blender. I just stuck mine in the crock pot and went to town. If you prefer your soup a little chunky, then skip this step, but I didn’t want my tomato soup to look like vegetable soup. And if you don’t have a hand blender, throw it in a blender or food processor until blended.

Before I blended up the veggies.


4. About 30 minutes before serving prepare a roux. Make a roux might sound difficult, but it was really quick and simple. Melt butter over low heat in a skillet and add flour. Stir constantly with a whisk for 5-7 minutes. Slowly stir in 1 cup hot soup. Add another 3 cups and stir until smooth. Add all back into the slow cooker. Stir and add the Parmesan cheese, warmed half and half, salt and pepper. Add additional basil and oregano if needed (the slow cooker does a number on spices and they get bland over time, so don’t be afraid to always season to taste at the end). I added another teaspoon of dried basil and also added about 10 chopped fresh basil leaves. Also, nice to garnish with fresh basil.

5. Cover and cook on LOW for another 30 minutes or so until ready to serve.

Garnish with fresh basil and enjoy! You know what would go well with this soup??? The garlic knots. Delish!


Tuesday, December 4, 2012

Banana Nut Bread


It’s the perfect time of year for Banana Nut Bread! Who doesn’t like banana nut bread?? Crazy people, that’s who! It’s so delicious warm out of the oven with maybe a little dab of butter. Delish! This is a great recipe and makes a lot of batter. This is my Daddy’s recipe and it’s delicious. He’s such a great baker so I love to make his recipes anytime I can. This recipe makes two loaves which comes in handy. We are heading to FL this weekend to see my in-laws and my father-in-law can’t have nuts so I made one loaf with nuts and one without. I can accommodate everyone. No one needs to go without banana nut bread or just banana bread. Yum!

Ingredients:
1 cup light brown sugar
1 cup white sugar
1 cup cooking oil
3 eggs
3 cups self rising flour, sifted (see note below to make self rising into all purpose flour)*
1 T vanilla
1 cup chopped nuts (pecans or walnuts)
5 large, very ripe bananas (mashed) - I upped it to 6 bananas and it was even better. I usually peel and freeze my bananas as they get very ripe and pull them out, thaw, drain, and it's ready for banana nut bread!

Directions:
Preheat oven to 325 degrees. Grease and flour 2 loaf pans. Cream sugars, oil and eggs. Add flour 1 cup at a time and mix well. Add vanilla, bananas and nuts and mix well. Pour half of mixture in each loaf pan and bake for 1 hour or until brown. 


Cool for a bit, but be sure to enjoy a slice while it’s warm!  Banana nut bread is the absolute perfect treat!


Make a loaf or two so you can enjoy a treat now.

*If you are using all purpose flour like I always do, here’s all you need to do:
For each cup of flour add 1 1/2 teaspoon of baking powder and 1/2 teaspoon of salt and viola, you’ve made your own self-rising flour!