Tuesday, October 30, 2012

Sue's Carrot Cake

Carrot cake is my husbands all time favorite cake in the world.  This is not an exaggeration, he LOVES carrot cake!  And he doesn’t just like any carrot cake, all carrot cake in the world is measured up to the cake he remembers from his childhood, his mother’s recipe. He found one that measured up at the Mixing Bowl in Richmond, but apparently they have recently changed their recipe and it no longer measures up. My amateur pallet thinks it still measures up, but he’s the expert and it just won’t do anymore. So I had to take drastic measures.....I had to learn how to make the cake his mother made. This is stressful because what if it’s not as good as he remembers? Is that my fault? Can I make it like his mother did? What if she had some secret ingredient that she didn’t tell me about? So many things running through my head, but I sucked it up and made the cake! I’m a good wife, his birthday is coming up, so I figured, let’s tackle this sucker. And tackle it I did!! That’s right, he loved it! Let’s all breath a collective sigh of relief. It was everything he remembered about his mother’s. Well, at least he’s telling me that. He probably doesn’t want to hurt my feelings. That’s fine, I’m happy thinking I can make a carrot cake he loves. I’m sure his mom sprinkled her cake with love and some other magical ingredient, but thanks for sharing your family recipe from the 70s, Sue! Hopefully Sue doesn’t mind if I share her family recipe with a few of you guys. Okay, are you ready for the best carrot cake recipe ever?? Here it is......

Ingredients:
2 cups sugar
1 1/2 cup oil (use all of the oil!)
4 eggs
3 cups grated carrots
2 cups all purpose flour
2 teaspoons cinnamon
2 teaspoons baking soda
1 teaspoon baking powder
1 teaspoon salt
1 teaspoon vanilla
1 cup chopped nuts (I used walnuts)

Directions:
Okay, first of all, yes that does sound like a lot of oil, but trust me, we needed it. The first time I made it I reduced it by 1/2 cup and it could have been a little more moist. My  husband is all about the moistness of the carrot cake so I made it again for his birthday this week with 1.5 cups of oil and it was the moistest bestest cake you ever tasted! Trust me, don't reduce it!
Blend sugar, oil and eggs together until mixed well. Add grated carrots, mix until incorporated. Sift together flour, cinnamon, soda, powder and salt. Add 1/3 of dry mixture at a time to carrot mixture. Continue until everything is mixed well.
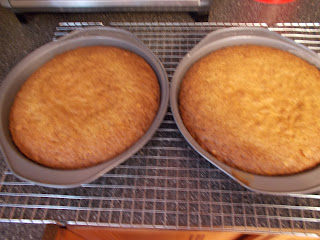
I prefer to make this in two 9” rounds because you get more icing in the center.  We love the cream cheese icing. Feel free to make a sheet cake like David’s mom always did. If you make a sheet cake, you’ll only need half the icing recipe.
Divide cake batter into rounds, bake in 350 degree oven for 35 minutes. Check after 30 minutes, especially if you cut back on the oil. Mine was perfect at 33 minutes. You don’t want it to over bake.
Now, while that’s baking, of course you’ll want to make the cream cheese icing. That’s really why you make carrot or red velvet cake!

Icing:
12 oz. cream cheese  (softened)      
1 stick unsalted butter (softened)
1 1/2 boxes powdered sugar         
1 tsp vanilla
Mix until smooth and spread generously on the 2 layers. 
Now cut a slice and enjoy the best carrot cake you’ll ever taste!
I made the icing recipe for a sheet cake (half) this time, but next time I'll use the quantites above and will have lots more icing to go around. It was a little sparce in the center for our liking. We like lots more! It didn't hurt the flavor though, the cake was still delicious.

Update: Made it again with all of the oil and all of the icing and it was perfect! Trust me!!

Tuesday, October 23, 2012

Chicken Noodle Soup


What is better in the winter time than homemade chicken noodle soup?? Nothing I tell you! The kitchen smells so good as it’s cooking and it makes the perfect meal. Full of veggies, chicken and just plain ole deliciousness. It’s my husbands favorite soup so he’s pretty happy that I’ve perfected this recipe. I’ve had a flop or let's call it, "not quite flavorful enough soup" in the past so I’ve upped the herbs and now it’s perfect! I’m writing this as mine simmers so I can’t wait to dig in at dinner time! And it's really simple, a huge plus!
Here’s what I did to prepare the soup. Before I went to bed the night before I was going to make it, I put a whole chicken in the crockpot and let it cook overnight. I also filled up the crockpot with water, a few stalks of celery, onion, peppercorns and garlic so that I’d also be making the broth all at one time. How’s that for multi-tasking?? I thought it was pretty ingenious so I hope you are a little bit impressed. This soup is so much better with homemade broth, but it’s also delicious with store bought broth. I made it for my parents this summer and didn’t have homemade broth and it was still perfect. They  loved it! Okay, enough talk, let’s get to making the best chicken noodle soup ever!
Ingredients:
4 Tablespoons olive oil
1 onion diced
6 stalks celery – sliced
6 carrots – diced
1.5 tablespoons chopped fresh rosemary (or dried)
1.5 tablespoons chopped fresh thyme (or dried)
1.5 tablespoons chopped fresh Italian flat leaf parsley (or dried)
4 quarts (plus) chicken broth (homemade if you have it).
3.5 cups cubed skinless, boneless chicken breast meat
16 oz package egg noodles
salt and pepper to taste
Directions:
In a large pot, over medium heat, cook onions, celery and carrots until soft. Put the lid on and cook about 30 minutes (that’s how long it took mine to get good and soft). I don't want to bite into crunchy carrots in my soup......it's happened before!

Add rosemary, thyme and parsley and stir. Simmer for another 5 minutes and add chicken stock, noodles and chicken cubes. Simmer over low heat for 30 minutes. Salt and pepper to taste and enjoy!

Look how flavorful the homemade broth looks with all the herbs. Yummy!
I keep extra chicken stock on hand because as you eat this soup it seems to need more. I’ve probably added another 4 cups or more as the week went on while we enjoyed it for many meals. It's so good! I promise. :-)

Tuesday, October 16, 2012

Cilantro Lime Rice

 
Hello, my name is Dawn and I'm a carboholic! Yes, I love all things rice, pasta and bread! You may have suspected that by reading this blog, but I thought I'd go ahead and confess so I'd feel better. Whew, that did help a little.
 
So the hubby doesn't love rice as much as I do so I try to jazz it up so he won't notice that it's just rice. Shhhhhh. I could have it every other meal, but him, not so much. Well, what's left for me really to do but trick him just a little? Please don't tell him that I'm trying to trick him with jazzed up rice. I don't think he's noticed so mum's the word!
 
We were having some quick and easy burrito's one night last week and I thought, "oh boy, here's a night to throw in a delicious rice dish!" But I even stepped it up a notch this night. See, he loves cilantro so I searched the internet looking for a Mexican rice dish with cilantro. I remembered my friend, The Pioneer Woman, making a similar dish so I set out to find it. Well, hers seemed fine, but I thought I could make it better, so I did. I mean, what does she know with her silly blog and cooking show?? I'm practically a chef! Here's my version of Cilantro Lime Rice. The lime juice really makes this taste fresh and yummy!
 
Ingredients
 
1 Tablespoon olive oil
3 cloves garlic
1 large onion, chopped
2 cups long grain rice
1 teaspoon salt
3-4 cups chicken broth
1 can diced tomatoes with green chilies, I used Rotelle
Juice of 3 limes and zest of 2 (hold back juice of 1 lime for garnish)
1/4 cup chopped cilantro
 
Directions
 
Heat oil in large skillet over medium heat. Add the garlic and onions and cook for 3 to 4 minutes. Reduce heat to low and add the rice and salt. Cook over low heat for 3 minutes, stirring constantly to make sure rice doesn’t burn. Add 2 cups of the broth, tomatoes, and the juice and zest of 2 limes and bring to boil. Reduce the heat to low, cover and simmer for 10 to 15 minutes or until the rice is done. Add more liquid as needed. I used brown rice so remember you’ll need to cook a little longer and most likely need more liquids as you go. The rice shouldn’t be sticky.


Just before serving stir the juice of 1 lime and cilantro into the rice mixture.
 
Serve with some delicious tacos, burritos, or whatever floats your boat, and enjoy!!
 

Thursday, October 11, 2012

Mini Blueberry Turnovers

I feel like I say I love blueberries a lot, but I really do! I think my problem is that I just love food a lot! I haven't really loved blueberries this much all my life though.  I really started loving them when I started cooking with them fairly recently. They really are delicious! And good for me, right? Full of antioxidants so it's practically a healthy mini pie! I think you might lose weight if you make this recipe.
David and I were sitting around watching TV the other night and I started getting a craving for a tasty treat. I hopped around on the internet looking for a mini blueberry pie recipe and couldn't really find what I was looking for. I had crescent rolls in the fridge and blueberries in the freezer and needed to make a recipe work with that. I found enough to piece this together and I was pretty pleased at how these pies turned out. They really were delicious. I'm not kidding. David was quite pleased with his TV snack while we waited for the Amazing Race to come on.
Here's how to make Dawn's Blogalicious Mini Blueberry Turnovers.....
Ingredients
1 cup fresh or frozen blueberries. I find the the frozen wild ones work the best because they are small and work better in a mini pie.
1/4 c sugar or Splenda
2 Tablespoons flour
1 teaspoon lemon juice
1/8 teaspoon salt
1 can crescent rolls
Directions
Mix all ingredients together in a bowl.
Prepare the crescent rolls for filling. Unroll two (keep attached) and cut in half so it is a square instead of triangle. Press two pieces together to secure.
Place a spoonful of filling in one side of the roll, fold over and press edges closed. Mine were pretty full and bursting at the seams, but I just worked with it until it was sealed.
Press a fork around edges to crease and seal. Also cut a slit in the top of each so the steam can escape. Some of them were already popping open so I didn't have to cut an additional slit.

Cook according to the crescent roll package, which should be 10 -12 minutes.  I cooked mine the full 12 minutes so that they were nicely browned.
Now you could stop here or go one step farther and make this delicious glaze to drizzle on the top. I say kick it up a notch and drizzle!
Glaze
This made a lot of glaze for 8 mini pies so I'll probably cut it in half unless I'm making a double batch.
 
3/4 cup powder sugar
1 Tablespoon lemon juice

 
That’s it! Could that be any easier?? Mix it together well and drizzle on top of the pies.
Now all you have left to do is serve warm and enjoy! These are such delicious little pies. You won't be able to eat just one.....David and I have proven that! I hope you enjoy these as much as we did.

Sunday, October 7, 2012

Dawn's Awesome Marinara Sauce


That's right, I named this DAWN'S Awesome Marinara Sauce because it's MY recipe. I wrote it. Are you impressed? Well, I am! Wait, does this make me a cookbook author now?? I think it does. Remind me to add that to my resume' later.
Okay, one of the many things that I love is pasta with red sauce! I love it, I can’t get enough of it, but I had never made it from scratch until recently. The jar was always my friend. I know, I should be ashamed, but I’m not! My husband’s Aunt Joanne makes the best homemade sauce. When she comes down for a visit she and her sister, Sue (my mother-in-law) cook lots of sauce and jar it with her delicious meat balls so we all have lots in the freezer. Well, since Aunt Joanne can’t come down all the time and for some reason she hasn’t tried to ship this to me, I’ve had to come up with my own recipe. I’ve tried one of Rachel Ray’s recipes and tried to recreate Aunt Joanne’s but it just hasn’t been perfect. So I got in the kitchen and kept adding things until I thought it tasted perfected and here’s what I came up with. I’ll have to admit, it’s pretty darn good sauce. I’m still mastering it so don’t be surprised if this recipe changes from time to time.
Ingredients
3 Tablespoons olive oil
1 medium onion, chopped finely
6 cloves garlic, minced
1/2 cup white wine or chicken stock
3 Tablespoon tomato paste
1 Tablespoon dried oregano
1 Tablespoon dried basil
I Tablespoon dried or fresh parsley (if using fresh, add a little more)
1/4 c (plus) fresh chopped basil
1/2 teaspoon salt
2-3 bay leaves
1 teaspoon red pepper flakes
2 cans (28 oz each) crushed tomatoes
Grated parmesan cheese for garnish

Directions
Add olive oil to pot or dutch oven, heat and sauté onion for 3-5 minutes. When onions have softened add garlic and continue to sauté for another minute or so.
Deglaze with white wine or chicken stock. After most of the liquid has absorbed, add 3 T of tomato paste (the tube is the best invention ever), red pepper flakes, salt and all dried herbs. 

Best invention ever!

Stir and add 2 cans of crushed tomatoes and bay leaves. Put lid on and simmer for 30 minutes to an hour. If you have an hour to spare, go for it because they just gives the flavors more time to marry and become even more delicious. Right before the sauce is finished, add the fresh basil, stir in sauce, but save a little for garnish. I think the sauce tastes brighter if you throw in some fresh basil at the end, but don't worry if you don't have it. It is still going to be delicious!

Now let's simmer for an hour or so.
Now I don't usually just serve the sauce, I need some meat in there somewhere. Luckily I had a few of my special meatballs in the freezer so I added those to the sauce while it simmered for an hour. I'll write that recipe another day. You can also add ground beef or turkey, but one of our favorites is to add Italian sausage links. Yummers!

Doesn't it look delicious after it's simmered for over an hour??


Serve the way you like it best over pasta and enjoy!

Monday, October 1, 2012

Chocolate Coma Cake


If there is one thing my husband loves, it’s a chocolate cake! More precisely, THIS chocolate cake recipe. I hope he loves me as much as he loves this chocolate cake, but I’m honestly not so sure. I should probably find out! This cake is so rich, chocolaty, delicious and super easy. There is virtually no measuring, just dump all the ingredients and mix. I’ve included the size of containers so you don’t have to measure it out.  How much easier can that get? I’m here to help you out and show you how to make the best chocolate cake you’ve ever tasted! 

But what is even better than this being my husbands favorite is the fact that I actually got to share this recipe with my dad. He is probably the best baker I've ever met, literally. Probably because he stayed home from school to sick to bake with his mama. That's a story for another time though. Bless his heart. He isn't a fan of chocolate, I'm not sure what's wrong with him, but I told him he should make this cake for their Christmas party they have every year. He was hesitant, but made it and now it's his most requested dessert. You're welcome Daddy! :-)

This is not an exaggeration, it is awesome and literally will put you in a chocolate coma! I took this to a party this weekend and everyone raved over it. The almond extract gives it a distinct flavor. I have a little left over cake from the weekend, after writing this blog I'm going to chow down on it now!

INGREDIENTS

1 package chocolate cake mix  (18 1/4 ounces)
1 3.9-ounce package instant chocolate pudding mix
2 cups sour cream (16 oz container)
5 large eggs
1 cup unsalted butter, melted and cooled to room temperature
1 teaspoon of almond extract
2 cups milk chocolate chips (1 bag of 11.5 oz chips)

DIRECTIONS
Preheat oven to 350 degrees F. Grease a Bundt pan. If you don’t have a Bundt pan, a 13 X 9" pan will do. (but reduce the baking time by ten minutes)
Mix all ingredients except chocolate chips until completely blended. Add chocolate chips and finish blending.


Even the batter looks delicious.....and it tastes delicious too!
Immediately place in prepared Bundt pan. Place in oven and cook for 50 to 55 minutes. Cool ten minutes before removing from pan.

Be sure to let it stay in the pan the full ten minutes to cool before you flip it over. I've had it fall apart on me because it is so hot and heavy so be careful!


It makes a nice large cake!
Now you can choose to dust the cake with powder sugar for a lovely presentation, drizzle with a warm chocolate sauce or really kick it up a notch and make the icing below. I’ve dusted and drizzled, but my husband prefers the over-the-top version with the icing. I’ll have to admit, it is pretty darn good. Here’s how to make the icing:

CHOCOLATE FROSTING

INGREDIENTS
3 cups sifted powdered sugar, divided
2/3 cup baking cocoa
1/2 (1 stick) butter or margarine, softened
5 to 6 Tablespoons milk, divided
1 teaspoon vanilla extract


DIRECTIONS
Beat 1 cup powdered sugar, cocoa, butter, 2 T milk and vanilla in a bowl until creamy. Gradually beat in remaining sugar and milk until smooth.

Look how pretty the cake looks frosted. Make this and thank me later!