Sunday, October 6, 2013

Roasted Broccoli


I wouldn’t normally get excited about broccoli, but let me tell you, I’ll never go back to the old way I cooked broccoli! This way was delicious and now there is no turning back! I found this on Pinterest a few months ago and have been meaning to try it, but always forget. Well, tonight was the night and boy am I pleased about it! It couldn’t have been easier and roasting it in the oven gave it such great flavor.....the garlic didn’t hurt either! I mean, it is broccoli and how excited could we all get about broccoli, right? Well, now I’m not going to eat broccoli because my body needs a green vegetable in it, now I’m going to eat it because it’s delicious and I love it! How about that?? My dad my be fainting right now because I was a very picky child. Not anymore, I’m all grown up!


The pinner who pinned this said she’d never cook broccoli any other way and I was like....”yeah right. What’s so great about roasting some broccoli??” Boy was I wrong. This was crunchy and flavorful and just delicious. I highly recommend giving this a try! It’s so easy, you can’t mess it up.


Ingredients:

 
Fresh broccoli crowns (whatever quantity you need)

2-3 tablespoons olive oil

1 tablespoon minced garlic

salt and pepper to taste


Directions:
 
Chop up the into edible size pieces and place in a bowl or large zip lock bag. Drizzle with olive oil, salt, pepper and add minced garlic. Toss so that broccoli is well coated with all ingredients.   Then spread on a cookie sheet lined with aluminum foil. 

Roast at 425 degrees F for 20-25 minutes. Remove from oven and enjoy! Trust me, you’ll love it!

Wednesday, October 2, 2013

Spicy Chicken Legs

 
I'm baaaaack! I’m sorry to keep you hanging for such a long time, but hopefully I can get back to regular cooking and blogging soon. I know you’ve missed me.  :-) Okay, well at least I’ve missed telling you about my latest and greatest recipes that I’ve found. This one is from one of my favorite cooks now, The Pioneer Woman. She cooks some great and simple stuff. Love her show and her cookbooks. I wish I had a little extra house like she does too. I’ll live in her “lodge” any day of the week!

 
I love chicken and dark meat chicken is just the bomb! It’s so juicy and delicious. Yes, I know the white meat is better for me, but if I want some awesome flavor I’m going for a thigh or a leg. That’s what the money is! As my friend, Guy, would say. Let’s get to cooking some spicy chicken legs......


Ingredients:
 
  • 24 whole Chicken Legs
  • 2 sticks Butter
  • 1 Tablespoon Hot Salt or Cayenne (or your favorite seasonings)
  • 1/2 cup Lemon Juice

Instructions:

Melt 2 sticks of butter in a saucepan. Pour ½ cup of lemon juice (fresh or bottled). Now add your seasonings. In this case, 1 tablespoon of Morton’s Hot Salt (which I did not have). You can use whatever seasonings you have on hand. You could use minced garlic, salt and Cayenne pepper. If you want them spicy, like the name says, then go with Cayenne if you don’t have Hot Salt. Stir it together until combined.


Rinse and pat your chicken legs dry. With metal tongs, transfer them one by one into the butter mixture and place on a baking sheet.
 
Once all of the chicken legs are coated and on the baking rack, take a pastry brush and give them one last coating of the butter mixture. Sprinkle them with some more of your seasonings.


Place them into a 400-degree oven for 30 minutes. If they need a bit more color, turn on the broiler for a couple minutes and watch them closely. Remove them when they are nice and golden brown.


Wasn’t that easy? You and your family will thank me later. You can adjust the heat by adding more or less seasoning. I would go with a little more because the butter dilutes it a bit. I'll shake a little more on before I put them in the oven next time. Either way, they are delicious though! Enjoy!

Friday, September 27, 2013

Brunch at the Egg & I


Okay, I know I've fallen behind on my blogging and I am really sorry about that. We are living like vagabonds between Georgia and Virginia and I just ended my job. We've had a lot going on but I promise to get better. Maybe while I'm not working I'll have time to watch more cooking shows and get back to blogging.....the important things in life.  I've missed my friends Ree, Giada and Ina. 

Just so you know, I am writing this while on an 8 hour road trip with my husband and two dogs. I'm typing it on my iphone. Are you impressed now?? Probably not, right?

While we wait on more interesting blogs, let's check out an awesome meal I had recently. The hubby and I tried a new brunch spot, The Egg & I, and it was surprisingly delicious! We both went for the pancake, yes that's singular. Check out the pic and you'll see why. It was huge! Bigger than a newborn baby! I went for blueberry, of course. Mine was served with a warm compote that was also yummy.  I probably ate a third of this massive pancake. I'm not THAT much if a pig!

All in all, great new spot and go with someone to share a pancake!

I promise a new recipe soon! Stay tuned...

Wednesday, August 21, 2013

Easy One Pot Tomato Basil Pasta


Okay, everyone has been posting this easy one pot recipe on Facebook and pinning it on Pinterest so I HAD to try it. I had to do it for my readers. We needed to see what was so great about this and if it was as easy as it looked. Well, I’m here to tell you....it was all those things! Super easy and pretty darn tasty too. It’s awesome that everything goes in one pot, even the uncooked pasta. What an genius idea! It’s so awesome,  I have to share it with you guys. This is perfect for a quick meal after a long day at work. Throw in some chicken or shrimp and you really have a great meal. Here’s what you need to make this yummy dish.

 
Ingredients:


12ounces pasta (I used thin spaghetti because I like it best)
1can (15 ounces) diced tomatoes with liquid ( I used Italian style)
1large sweet onion, cut in julienne strips
4cloves garlic, thinly sliced
½teaspoon red pepper flakes
2teaspoons dried oregano leaves
2large sprigs basil (about 10 leaves), chopped
cups vegetable or chicken broth (I used about 1 cup of white wine and the rest homemade chicken broth for better flavor). Can also use water.
2tablespoons extra virgin olive oil
Parmesan or feta cheese for garnish (or whatever cheese tickles your fancy)

Directions:

Place pasta, tomatoes, onion, garlic, basil, in a large stock pot.

Pour in vegetable or chicken broth. Sprinkle on top the pepper flakes and oregano. Drizzle top with oil.


Cover pot and bring to a boil. How easy is that? Reduce to a low simmer and keep covered and cook for about 10 minutes, stirring every 2 minutes or so. Cook until almost all liquid has evaporated. Season to taste with salt and pepper , stirring pasta several times to distribute the liquid in the bottom of the pot.

Serve garnished with Feta or Parmesan cheese and maybe a fresh sprig of basil. Everything is better with feta, right??


Thursday, August 15, 2013

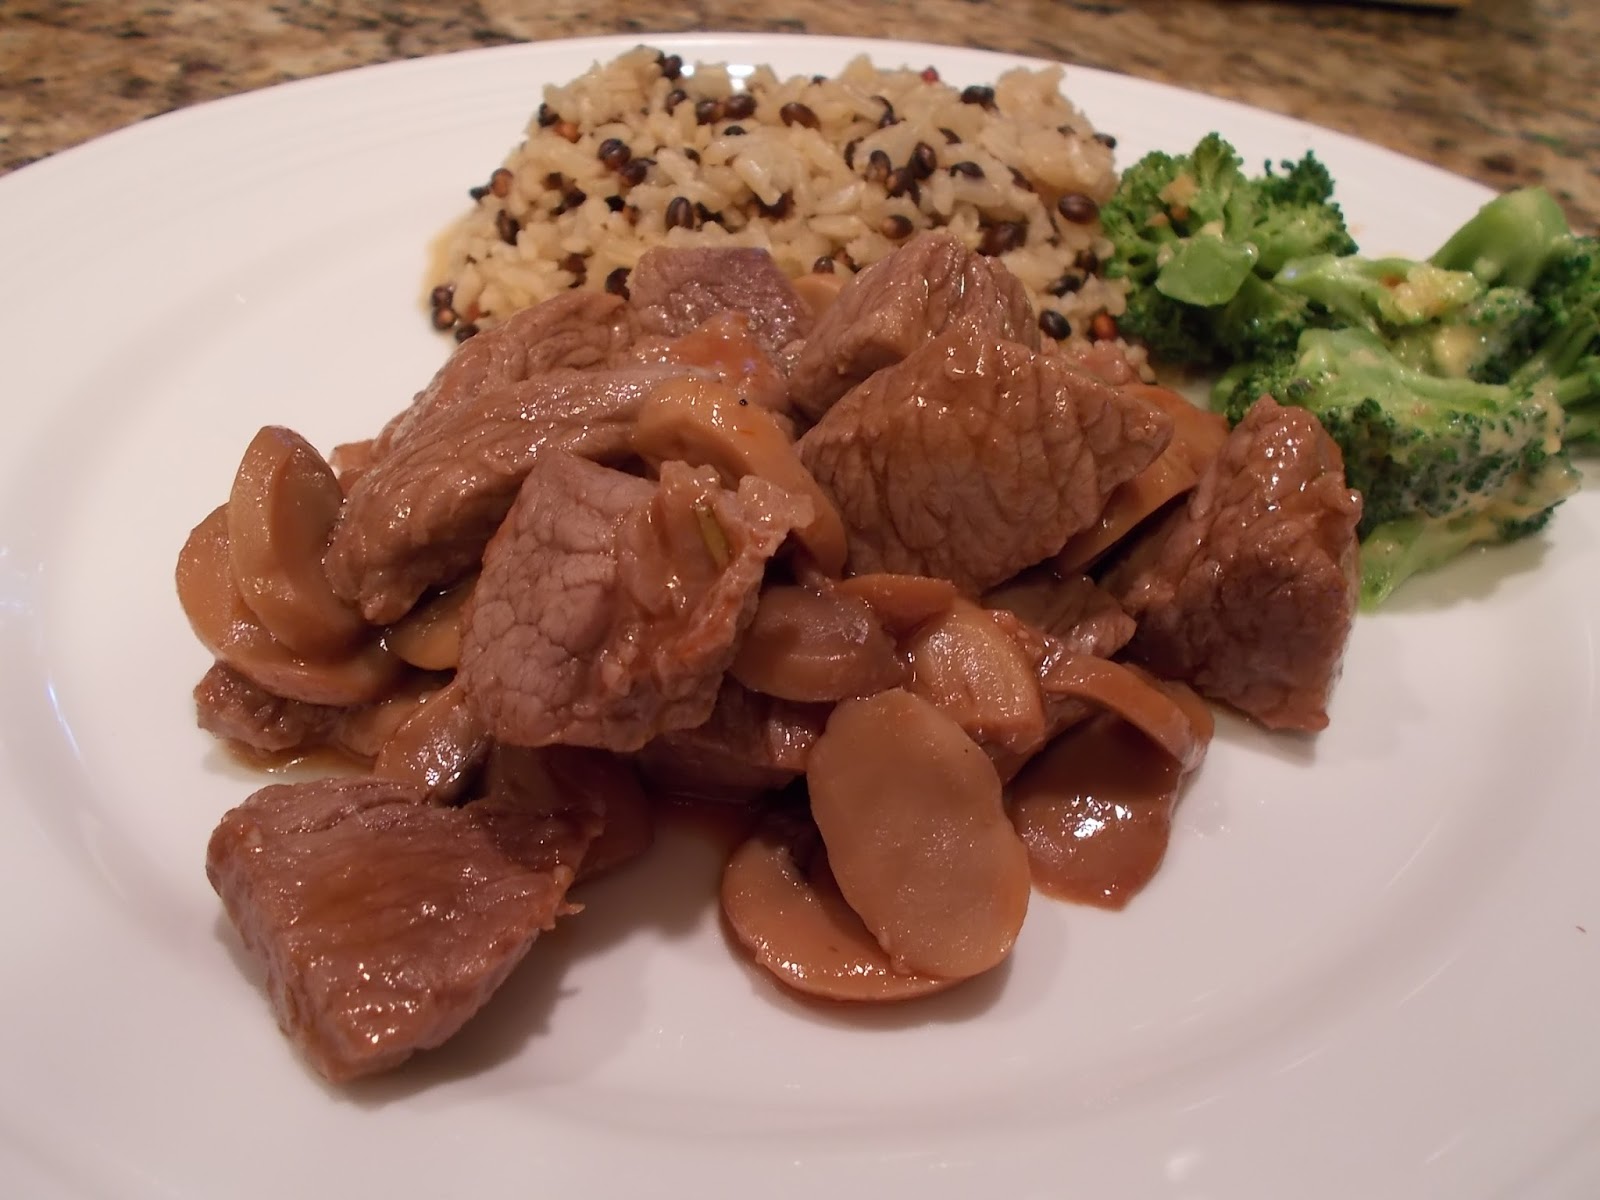
Sirloin Tips w/Mushrooms


For those of you that know me, you know the hubby and I (and Eli & Henry) are moving back to Atlanta! We are so excited, but it’s a stressful time. David is already working and living in Atlanta and comes home on weekends. When he comes home, I want to cook him some delicious meals. He eats Subway all week for dinner and that’s just not acceptable! I found some beef tips in the freezer and decided I needed to make something with them. I found this recipe on allrecipes.com. I’m going to tell you one change I would make up front. The liquid was a little thin and I would prefer it to be more of a gravy. The next time I make it, I will flour the meat prior to browning it so it will make a thicker sauce. Since it wasn’t thick this time, I whipped up a little cornstarch and liquid mixture and added it back to the pan. That helped. So my recommendation is flour the meat first. Got it? Okay, let’s move on with this recipe. Here’s what you need to get started.

Ingredients:

3 Tablespoons
3 cloves garlic, minced
1.5 pounds beef sirloin
1 – 16 oz can mushroom slices, with liquid
1 – 8 oz  can tomato sauce
salt and pepper to taste
3/4 cup red wine

Directions:
 
Cut beef into cubes and lightly flour. In a large skillet over medium/high heat, heat the olive oil and brown beef cubes with the garlic.


Add mushrooms with liquid, tomato sauce, salt, pepper and red wine. Cook for 30 minutes or until beef cubes are tender. Add a little more wine while cooking if desired.
 
Of course, you'll want to serve this with some rice (or other yummy starch) so you can enjoy more of the liquid/gravy!

Wednesday, August 7, 2013

Shrimp with Garlic & Parsley


We recently found out that we are relocating to Atlanta. Yes, we are moving back home! It's very exciting and overwhelming at the same time. Since we've been a little busy, I've been looking for quick and easy recipes. You can't eat out for every meal, right? Well, I guess you could, but you might be as big as the side of a house! No comments please. I need to find time to cook at home and make it worth our while. This is a great recipe I found on Pinterest. Quick, easy to prepare and full of flavor! I think you'll like it too. I served this with rice so I'd have a starch to soak up the sauce. You should definitely serve with rice or pasta.....and my rosemary sea salt rolls won't hurt either!

Ingredients:
  • 4 to 5 Tbs. olive oil
  • 4 garlic cloves, minced
  • 1 tsp. red pepper flakes
  • 1 tsp. sweet paprika
  • 1 lb. medium shrimp, peeled and deveined (I used my large frozen Costco shrimp)
  • 2 Tablespoons fresh lemon juice
  • 3 Tablespoons dry white wine
  • salt and freshly ground black pepper, to taste
  • 2 Tbs. chopped fresh parsley
Directions:

In a sauté pan over medium heat, warm the olive oil. Add the garlic, red pepper flakes and paprika and sauté for 1 minute until fragrant.
 
Increase the heat to high, add the shrimp, lemon juice and dry white wine, stir well, and sauté until the shrimp turn pink and are opaque throughout, about 3-5 minutes.
 
Season with salt and black pepper, sprinkle with the parsley, serve and enjoy!


Tuesday, July 30, 2013

Brussel Sprouts


Who would have thunk it?? I'm writing a blog about brussel sprouts! People will be shocked and amazed, but it's true....I like brussel sprouts! I'm not going to get crazy and say I love them, but I do like them. I've made them at home a couple of times and I've even ordered them at restaurants. My parents will be most surprised since I pretty much only ate corn on the cobb and french style green beans growing up. I was a picky child, but I'm all grown up now and can make brussel sprouts! Are you impressed? You should be.

My hubby prefers the brussel sprouts a little soft so I found this recipe from a friend of mine, Rachel Ray. Thanks Rach!


Ingredients:

3 slices bacon, chopped
1 tablespoon extra virgin olive oil (EVOO)
1 shallot, chopped (I used a small onion because I never have shallots)
1 1/2 pounds Brussels sprouts, trimmed, small sprouts left whole, larger sprouts halved
Salt and pepper
1 cup chicken broth

Directions:

Brown bacon in a medium skillet over medium-high heat. Remove bacon to a paper towel-lined plate.

Trim brussel sprouts and cut in half. Aren't they just a cute little veggie??


Add EVOO to the pan, about one turn of the pan. Add shallots to the pan and
sauté 1-2 minutes. Add Brussels spouts and coat in EVOO.


Season with salt and pepper. Cook Brussels sprouts 2-3 minutes until they begin to soften, then add broth. Bring broth to a bubble, cover and reduce heat to medium-low. Cook 10 minutes, until tender.

Transfer sprouts to a serving dish with a slotted spoon and top with cooked bacon bits.

 
This was a quick and easy and most delicious dish. The hubby was very pleased!

Wednesday, July 24, 2013

Easy Prawns


I love seafood, all kinds. Pretty much if it swims in the ocean, I’ll eat it. I love, love, LOVE seafood! Shrimp is one of my favorites, which means prawns are too. What is the difference anyway? Prawns are larger? Maybe I’ll look that up and get back to you with an answer. This is a quick and easy recipe that a friend of mine, Laura (I actually know her in person, not on TV), introduced me too. We were at a dinner party and Laura served these prawns and they were delicious! When she told me how she made them, I knew I had to give it a try it. I love a simple recipe that is also full of flavor. This recipe is  so easy and it looks like you went through a lot of trouble to make a fancy meal. There is a secret ingredient though.....get ready for it.....beer! I think that’s a secret ingredient in a lot of recipes. Ready to learn Laura’s secret?? Oh, and don’t tell her I told y’all her secret recipe. Here’s what you need to get started......
Ingredients:
Prawns – whatever quantity suits your needs
salt and pepper to taste
basil, thyme and/or fresh parsley
4 cloves garlic
1 beer
4-5 T butter
1/2 teaspoon red pepper flakes
Directions:
Line a baking sheet with aluminum foil and leave enough to cover the top with the same sheet, so pull off double the amount you need. This method prevents the liquid leaking out. Lay the prawns out on the baking sheet in rows, sprinkle with salt and pepper, garlic, our in beer, lay a few pats of butter on top, sprinkle with red pepper flakes. If you have a few fresh herbs, throw them in too. Normally I would have used parsley, but I was out so I used some fresh thyme and basil. To spice it up, you can sprinkle in a few red pepper flakes.
Cover with top layer of aluminum foil and bake at 375 for 15-20 minutes. Check the prawns and make sure they beautiful bright pink. If they aren’t, pop them back in for a few minutes until they are as pretty as the picture below. Don’t they look yummy??
If you have fresh parsley, sprinkle a bit on for garnish. It makes everything prettier. Scoop out prawns, serve and enjoy immensely!  Thanks Laura!

Tuesday, July 16, 2013

Texas Hash

The photo doesn't do it justice! It tastes better than it looks!

Don’t let the name “hash” scare you. This is an old family recipe that is delicious. It’s just meat, rice and tomatoes, don’t be afraid. I found my Grandmother’s handwritten recipe in my recipe box the other day and had to make it. I think this is actually my dad’s recipe that my grandmother used to make. She note up in the corner “Ernest’s recipe”. Ernest is my daddy and the reason I love cooking. He got his love of cooking from his mother. I’ll let you in on a little secret....he failed the First grade. Yes, surprising isn’t it? Well, apparently he didn’t go to school enough to get a report card! See his little trick was to pretend like he was sick and then he’d just stay home and cook with his mama. Isn’t that sweet? We make fun of him for it so it’s okay if you want to too. He was the baby so she didn’t make him go to school if he was sick (read in a sarcastic tone). It makes me laugh.....but I benefited from it all my life. Sorry Daddy, your secret is out. Love you! :-)

Now that I’ve told my Daddy’s secrets, let’s get started on one of his recipes. This one is so easy and quite delicious too! I apologize for the lack of photos, but it’s such a simple recipe I thought you could probably figure it out. Okay, fine, I actually forgot to take pictures! But I think you’ll be fine if you following these directions. By the way, here's a copy of my grandmother's hand written recipe. I cherish this recipe.


Ingredients:
 
1 pound ground beef (or turkey, which is what I used)
1 bell pepper, chopped
1 large onion, chopped
1 – 16 oz can tomatoes (I like to use the ones with Italian seasoning)
1/2 cup uncooked rice
2 teaspoons salt
2 teaspoons chili powder (or more if desired)
1/8 teaspoon pepper
 

Directions:

In a large skillet brown meat (do not drain) add pepper and onion and cook until tender. Add remaining ingredients and heat thoroughly. Pour in 2 qt casserole dish. Bake at 350 degrees for 1 hour. I decided to cut some fresh basil and toss that in at the end too. You can't go wrong with fresh basil, right?
 
I hope you enjoy this recipe as much as my family does!

Wednesday, July 10, 2013

Creamy Garlic Pasta w/Shrimp

 
As you may know, I love carbs! Did I mention that I love carbs, especially in the form of pasta and bread?! They are so delicious! I found this recipe on Pinterest a while ago and finally got around to making it. I find so many great recipes on Pinterest. One day I’ll get around to making all of them......maybe.  I was very pleased when I finally made this recipe, and so was my husband. This pasta dish gives a great punch of flavor.  Full of cheese and garlic. What could be bad about that, right? I added shrimp to the recipe to make it a more filling dinner. So now you’ve got garlic, cheese and shrimp. What a great combination. My mouth is watering, let’s get started with this recipe:

 
Ingredients:

 10-20 frozen shrimp, whatever suits your needs
2 tbsp butter
¼  tsp salt
½ tsp pepper

3 cups chicken stock (homemade if you have it)
½ lb angel hair pasta (I used whole wheat)
1 cup grated parmesan cheese
¾ cup heavy cream

2 tbsp chopped fresh parsley

Directions:

In a pot, bring the olive oil to medium-low heat. Add the garlic and stir, allowing it to cook for 1-2 minutes. Mix in the butter until melted.
 
Add the salt, pepper and chicken stock. Raise the heat to high and let it come to a boil. 

Once it is at a rolling boil, add the pasta and cook for as long as the box’s directions indicate. Reduce the stove to medium heat, add shrimp, and mix in the parmesan until completely melted. I used frozen shrimp so I just thawed and stirred into hot mixture. Turn off the heat and stir in the cream and parsley. Serve immediately.

Adding the fresh parsley at the end makes the presentation lovely and gives it a nice freshness. I definitely recommend trying this dish.