Wednesday, June 3, 2015

Blackberry Cobbler


Let’s don’t even get into the fact that I’m a crappy blogger. Let’s focus on Blackberry cobbler! My husband went to Sprouts (a Farmer’s Market type chain) and bought the best fresh fruit today. That sounds like a great idea, but my husband’s motto is “more is better” (thanks to Bill Stewart) so we are overflowing with fruit that I’m afraid we can’t eat before it goes bad! So when you are faced with that situation.....make a cobbler! Sounds like a great solution to me. I love eating and making cobbler. Not only is it delicious, it’s so simple to make. Who doesn’t love a delicious, quick dessert? Most of my cobblers are made with frozen fruit but tonight I used fresh berries and this is the best cobbler I’ve ever eaten! I’m not even exaggerating. This is for realz! I had to beg my husband not to go back for THIRDS so we’d have some for tomorrow night! I can’t keep it from you any longer. Here’s the recipe my friend, The Pioneer Woman, shared with me....


Okay, this isn't a cobbler, but doesn't it look delicious?? Just a sample of our haul from Sprouts!

Ingredients:


  • 1 stick Butter, melted
  • 1-1/4 cup Sugar
  • 1 cup Self-Rising Flour
  • 1 cup Milk
  • 2 heaping cups Blackberries (frozen Or Fresh)

Instructions:


Melt butter in a microwavable dish. Pour 1 cup of sugar and flour into a mixing bowl, whisking in milk. Mix well. Then, pour in melted butter and whisk it all well together. Butter a baking dish.


Now rinse and pat dry the blackberries. Pour the batter into the buttered baking dish. Sprinkle blackberries over the top of the batter; distributing evenly. 


Sprinkle ¼ cup sugar over the top.


Bake in the oven at 350 degrees for 1 hour, or until golden and bubbly.


Wednesday, April 22, 2015

Corn Bread


You might be thinking, why is she posting a recipe for cornbread. I can just pop open a box of Jiffy and have the best cornbread ever. Well, I was on the same page with you until I tasted THIS cornbread! This melts in your mouth like butter. It is seriously the best tasting cornbread you’ll ever put in your mouth. It probably helps that it all starts with a box of Jiffy and you enhance the Jiffy deliciousness. To quote a friend of mine, “this is crack cornbread!” Thanks Brian Beam! It really is so moist, it’s almost like a corn pudding. Just trust me, it is so delicious. Promise me you’ll make it at least once to find out what is so great about it. And I’ll promise you, that it won’t be the last time you make this cornbread!
 
I can't take credit for creating this gold mine, I got this recipe from my Hampton Park Women’s Club cookbook. Our old neighborhood in Virginia women’s club collected recipes from neighbors and we made a cookbook. I have found some great recipes in that cookbook. I miss those neighbors too. You know what helps me forget though?? Cornbread! ;-) Let’s get to it.


Ingredients:

3 eggs

½ cup corn oil (I've even used vegetable oil and it turned out fine)

1 can creamed corn

8 ounces sour cream

¼ teaspoon salt

2 boxes Jiffy Corn Muffin Mix


Directions:

It couldn’t get easier than this….Mix all ingredients together and pour into a 9x9 inch greased pan.


Bake 30 minutes at 375 degrees and wait for it to turn into a golden delicious pan of heaven....isn't that beautiful? If you knew how yummy it was, you'd be running to the store now to stock up on the ingredients!


See, don't you want to just take a bite out of it right now? I needed to sample it before I took it to a party. I must say, I was quite pleased with how it turned out. You really need to try this recipe! Super easy, super moist, and soooooo delicious!


Note: These pictures are of the recipe doubled, which is why I used a bigger pan.

Tuesday, March 10, 2015

Crockpot Chicken Enchilada Soup


I love chicken enchiladas and I love soup! This recipe is the best of both worlds. A friend of mine recently sent me this recipe and I’ve been dying to try it. BTW, it’s a Paleo recipe if you are interested. I was mainly interested because it sounded delicious! I love nothing more than cooking in the crockpot. It’s the best feeling (and smell) to come home from work and finding your dinner already cooked and ready to eat. Crockpots make me happy. I’m easy to please. Cupcakes and Crockpots make me happy.  If they don’t already make you happy, cooking this soup in your crockpot will make you happy. My husband absolutely loved this soup. He went back for a hearty second bowl. It makes me happy when he loves a recipe that much. This is a keeper. I’ll be making this again very soon. Here’s how to bring a smile to your family’s face too:


Ingredients:

1 1/2 lbs. boneless skinless chicken breasts
1 medium yellow onion, diced
1 bell pepper, thinly sliced
1 jalapeno, diced
2 cloves garlic, minced
1 15-oz. can diced tomatoes
1 can Rotelle tomatoes
3 cups chicken stock
1 tbsp chili powder
1 tbsp cumin
1 tsp dried oregano
1/2 tsp paprika
1 teaspoon salt
½ teaspoon pepper
2 tbsp fresh cilantro, chopped (garnish)


Directions:
Add the chicken to the bottom of the slow cooker. Add the onion, bell pepper, jalapeno, and garlic on top of the chicken. Pour the diced tomatoes and chicken stock over the top. Sprinkle with chili powder, cumin, oregano, paprika, salt, and pepper.


Cover and cook on low heat for 8 hours. Use a fork to shred the chicken before serving. 


Taste and add salt and pepper to your liking. I added a little bit more of each. Garnish with cilantro and serve.


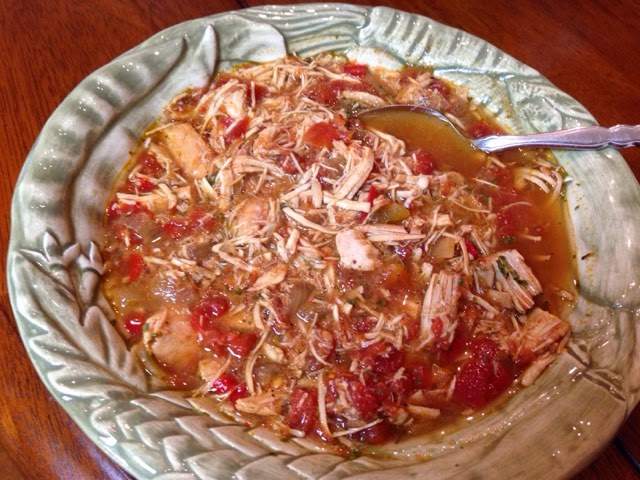
Look how hearty this soup is! It looks more like a stew than soup. That is a lot of chicken in one bowl. I didn’t have fresh cilantro on hand so I garnished with dried. I’ll have fresh next time I make it though.

Thursday, March 5, 2015

Pan Fried Pork Chops


Who doesn’t love a fried pork chop?? Well, I guess those that don’t eat pork, but everyone else, are you with me?? I love, love pan fried pork chops but don’t really make them often. I’m not sure why, it just doesn’t happen. After making these tonight and remembering how delicious they are, I think things will change around here.  Maybe we will turn into weekly pork chop people. Of course we had to have mashed potatoes to go along with them. Don’t worry, I had a green vegetable to balance my plate like my high school Home Ec teacher taught me. Thanks Mrs. Maxwell. Unfortunately we didn’t have pork chops and applesauce. Hopefully there are some readers out there that got my Brady Bunch reference. Okay, I’ll stop with my 1980s references and get down to pan frying some pork chops!


Ingredients:

4 bone in pork chops, not too thick

1 cup all-purpose flour

1 teaspoon seasoning salt

½ teaspoon pepper

½ cup canola or vegetable oil

1 Tablespoon butter

Salt and pepper to taste


Directions:

Combine the dry ingredients in a pan large enough to dredge your pork chops.


Salt and pepper both sides of your pork chops. Sorry I didn't put them on a fanc plate for you. I just kept them on the plastic wrap they came out of the freezer in. One might call it lazy blogging, but I call it efficient!


Heat oil over medium heat, then add butter. Butter helps the chops to brown (my friend, Ree Drummond taught me that trick)


Dredge each pork chop through the flour mixture to ensure each side is evenly coated.


When oil is hot, place 2-3 pork chops in at a time and start the browning process. If your chops are the thickness of mine, you’ll need about 4-5 minutes per side. Just make sure no pink juices are oozing from the chop. Once the first batch is done, remove to a plate with paper towel and finish up the batch.


How beautiful do these pork chops look? I think they look delicious and am ready to dig in! The hubby was quite pleased with dinner tonight!


Monday, February 9, 2015

Ooey Gooey Butter Cake

Not the best picture. I'll try it on a different plate next time.

How could you resist this recipe by the name alone?? What’s better than something named Ooey Gooey?? Okay, maybe something chocolate, but this is a mighty fine cake in its own right. I have heard about Paula Deen’s Gooey Butter Cake and always made a mental note to try this one day. Well, lucky for all of us, this day finally arrived. See, I was watching her sons’ cooking show, Not My Mama’s Meals, and Paula was actually on it. They were each making a version of this cake, Bobby’s a lighter version. Hands down, Paula’s had to win that contest. I’m sure his cake was fine, but it couldn’t have even been close to this version. Sure there are two sticks of butter in it, but why is that a bad thing? Everything in moderation people. I will give you a recommendation now…..don’t eat the cake all at once. Cut a slice and enjoy one at a time….over a few days. See, now you’ve been warned so don’t judge me for the amount of butter and sugar in this cake. But do trust me on this, it is delicious! Make this for your family, make this for a party, or like I did, just make it for two. J I think you’ve learned by now that we are gluttons and love to eat. Let’s just all accept that and move on. Now let’s get down to the nitty gritty and make this Ooey Gooey Butter Cake. Yes, I added an Ooey in there so now this makes my cake original!


Here’s what you’ll need to make this little gift from heaven:

·         1(18 1/4 oz) package yellow cake mix

·         1 egg

·         16 tablespoons butter, melted, divided (use separate bowls so you don’t melt together like I did….big mistake!)

·         1 (8 oz) package cream cheese, softened

·         2 eggs

·         1 teaspoon vanilla

·         1 (16 oz) box powdered sugar
 

Directions:

Preheat oven to 350°.

 
Combine the cake mix, egg and 8 tablespoons butter and mix well with an electric mixer.

 
Pat the mixture into the bottom of a lightly greased 13 by 9-inch baking pan. Excuse my finger indentions all of the crust.


In a large bowl, beat the cream cheese until smooth. Add the eggs, vanilla and 8 tablespoons butter and beat together.

 
Next, add the powdered sugar and mix well. Spread over cake batter and bake for 40 to 50 minutes. 


Make sure not to over bake as the center should be a little gooey. I would actually check after 35 minutes, if the top has browned, take it out of the oven. I think I cooked mine about 5 minutes too  long. Next time I’ll make it a little gooeyer (yes, it’s a new word).


It might not look fancy, but that is heaven in a pan waiting for me to take a bite!

Now cut a piece and enjoy this ooey gooey goodness! Also, feel free to sprinkle on a little sifted powdered sugar before serving. That just makes it so purdy.


Sunday, February 1, 2015

Velveeta Rotel Dip


Happy New Year Everyone! I apologize for slacking off in January, I’ll try to get better! I’m starting back the new year with an easy, go-to appetizer. I thought this would be appropriate since it's Super Bowl Sunday too. I was hesitant to blog about the best cheese dip of all time because I thought everyone knew how to make it, but apparently I was wrong. I was surprised when a friend of mine had never tasted nor made this delicious Velveeta Rotel dip. What? How can that be? I thought this was a world-wide treat. Is that not so?? It would be an injustice if I didn’t share this with everyone I can. I am here to spread the good news of Velveeta cheese, combined with Rotel tomatoes and sausage! Shout this recipe from the mountain tops! Okay, maybe you don’t have to get that extreme, but please make this and share with your friends. We need to get the word out and let everyone know what goodness you can create in a bowl within minutes! Here’s what you need:


16 ounces of Velveeta cheese – don't roll your eyes at my fake cheese, it’s delicious

1 can Rotel tomatoes

8 ounces ground sausage
(P.S. Velveeta nor Rotel is paying me for this blog)


How cute is that tiny Velveeta?? The store was out of 8 oz so I had to buy two 4 oz. So cute.


That’s it! Three ingredients. How awesome is that? Oh, you will want some chips for dipping. I recommend scoops! You can get more cheese goodness with each bite.


Directions:


Brown sausage in a pan – it’s that easy.


Cube Velveeta and place in microwave safe bowl. Pour entire can of Rotel over cheese, juices and all.


Microwave for 2 minutes, remove and stir. Once sausage is cooked, drained and add to microwave safe dish.


Microwave everything together for 2 more minutes, stir and enjoy. If you still have some cubes of Velveeta, just keep microwaving for a minute at a time until it’s hot and bubbling. You can also choose to serve this in a small crock pot to keep it warm. It cools down pretty quickly.


Now grab a chip, scoop up some dip and enjoy! Taste test and choose your chip wisely. It's the most important tool used to get cheese dip to your mouth!


Isn’t that the best and easiest appetizer you’ve ever seen? If you already know about this dip, just pretend like this is the best thing you’ve ever read. Thanks for playing!


Share with friends and Enjoy!

Friday, December 19, 2014

Crack! (or you could call it Saltine Toffee)


I've heard it called many things, but Crack is my favorite!

I had to laugh when I was reading my friend, Trisha Yearwood’s, cookbook. She loves this recipe because her mother always wanted something sweet after dinner and then immediately needed something salty. That is totally my husband! He always needs something salty after his sweet snack, whereas I am happy as a hippo ending with a sweet snack. I’m going to look like a hippo if I don’t keep ending with a sweet snack too!


A friend of mine brought these to a party we had years ago too. She gave me the recipe, but I lost it. I’m pretty sure this is it though. Angie, if you are reading this, is this it?? I fell in love with them at the party and couldn’t believe how easy they were to make. I love toffee and I love easy so this was right up my alley! I wanted to make a special treat for friends this Christmas so I pulled out my cookbook and found this recipe again. You definitely need to try this one. It’s so easy and worth every minute of effort put in!

 
Ingredients:

35-45 saltines

2 sticks (1 cup) butter

1 cup light brown sugar

8 (ish) ounces semi sweet chocolate chips*

*cooks note – I used one full bag (12 oz) of milk chocolate chips and it turned out great. I tried 8 oz first and it looked like I needed more to spread around so I added the whole bag.


Directions:

Preheat the oven to 425 degrees

 
Line 1 large or 2 small jelly-roll pans with aluminum foil, spray with nonstick spray and arrange the saltines salt-side down in a single layer. My jelly roll pan held 48 crackers and that was perfect.  


As you can see, I didn't listen to directions and place them salty side down. Uh oh!

In a medium saucepan, melt the butter and brown sugar together and boil until it turns a caramel color, about 5 minutes. Remove from the heat and pour over the crackers, covering them evenly.


Put the jelly-roll pan into the oven and bake for 3 to 5 minutes, or until just bubbly, watching carefully. 

can you see how bubbly and delicious it is looking right now?? Yum!
Remove from the oven and pour the chocolate chips over the crackers. When the chips melt a bit, spread them over the crackers with a knife.


and viola! Doesn't that look yummy already?


Transfer the pan to the freezer for 15 to 20 minutes, or until completely cold. My chocolate was still wet to touch after 20 minutes so I left it in for about 30 minutes. 

This will form one big sheet. Break it up into random pieces, any size will do. Store in an airtight container. Package for friends for holiday treats or just enjoy! My husband loves these because it was the perfect combination of his sweet and salty snack. These are a keeper. I think I’ll be making these again to take to my parents for Christmas.


Monday, December 15, 2014

Crockpot Dulce de Leche Sauce


Okay so this is possibly the coolest thing I’ve ever seen! I was watching one of my favorite weekend shows, on the Food Network of course, and Katie Lee taught me how to make Dulce de Leche sauce in the crockpot. Yes, you heard me right. I said in the CROCKPOT! What?? Now I love my crockpot but who knew I could make a yummy, creamy caramel sauce in it? And did I mention that you just need one ingredient? This recipe still blows my mind! I made it today and will be trying it drizzled over some apple pie shortly. So far I’ve only tried it drizzled over my finger. Don’t get me wrong, I enjoyed licking it off my finger but I think it will be even better drizzled on ice cream, pie, or added to coffee. Let’s just get down to this easy recipe.  Here’s what you need:


Crockpot
mason jars – I used three 8 oz jars
condensed milk – I used two 14 oz cans
water


Easiest directions ever:

Equally pour the 2 cans of condensed milk in the three mason jars. Seal lid securely.


Place jars in crockpot and fill crockpot up to the lids, without covering.


Cook on low for 8-10 hours. I cooked mine 9 hours and it was the perfect caramel color. You can cook longer for a deeper caramel color. If you keep peeking at the color by removing the lid, like I did, then you probably need to cook a little longer.


Remove jars from crockpot with tongs. They will be very hot. Let cool for a bit on a dish towel. Remove lid, stir to combine, and then eat a big spoonful! Okay, maybe not a whole spoonful, but at least get a little sample to make sure it's delish.


Look how beautiful it turned out! I’m totally giving this to a couple of friends as Christmas gifts. Did I mention that I made this in the crockpot??? I'm still amazed!


This will keep in the fridge for up to 4 weeks. Just remove lid and heat in microwave or you and just scoop some out and microwave a little at a time.