Pages

Wednesday, May 30, 2012

The BEST Cream Cheese Danish (and easiest!)


This is the easiest and most delicious cream cheese Danish you will ever make! I have a Christmas brunch every year and I think I’d have an uprising if I didn’t serve this Danish. Actually, I know I would. My RSVP’s rely on the fact if the Danish will be served! This is always the first to go. I think I need to make two next year so we don't feel guilty about seconds.....or thirds.  It really is soooooo delicious. Trust me, make it for your family and you’ll see.

Now I’ll be honest, I stole this recipe from my dad. That happens a lot. Why not, he’s the best baker I know. Here’s a funny fact about him.....he failed the first grade (a hundred years ago) because he stayed home to cook with his mama all the time. Isn’t that hilarious? He would fake sick in the morning and since he’s the baby he got away with it, but miraculously in an hour or so he felt better and could cook with his mom all day in the kitchen. Bless his little heart. Actually, it worked out for our family because he learned that he loved to cook early on and we got to reap the benefits of that little mama’s boy! ha-ha!

This is so easy, you’ll see. Here’s the details:

Ingredients:
8 oz cream cheese (at room temp)
2 cans of crescent rolls (I've used Pillsbury, store brand and low fat and they all work well)
1 t vanilla
1 t lemon juice
1 egg yolk
1 c sugar

Icing:
1 cup powdered sugar
1 T water (or milk – I always use milk)
1 T butter at room temperature

Spray rectangle casserole dish with non-stick cooking spray, layer with one package crescent rolls (just roll out, undivided as it comes out of can). Mix cream cheese, vanilla, lemon juice, egg yolk and sugar. Spread mixture over bottom layer of crescent rolls.
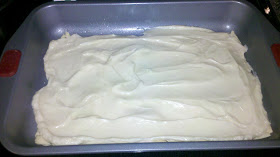
Shown: One layer of rolls on bottom with filling on top
Top with second can of crescent rolls. Brush top with egg white. That’s it! How easy is that?
Second layer of crescent rolls added
Cook for 20 min @ 350. Remove from oven and top with icing while it’s still hot so the icing melts into the Danish.
Man, this is so Delicious. Let cool for a few minutes, but serve while it's still warm. How yummy does this look?? Make this recipe now! Enjoy!

Monday, May 28, 2012

Easy Baked Onion Rings


We LOVE onion rings, but don’t eat them that often because they are usually heavily breaded and then deep fried. Not that either of those is a bad thing, but when you are trying to eat a little healthier, every little bit helps. I loved this recipe (thank you Pinterest) because it uses whole wheat bread crumbs and they are baked, not fried. It’s a baked vegetable so it must be good for me and have no calories, right? Well, that’s what I like to tell myself so don’t burst my bubble please.

I also loved this recipe because it was quick and easy. You basically slice onions, dip in flour, dip in egg, dip in bread crumbs and then.....oh wait, that’s it! See, anyone can make these. Want to know all of the details?? Okay, here we go.

Ingredients:
  • 1-2 medium yellow onions. I had Vidalia onions on hand and used two of those.
  • 1/2 cup all purpose flour
  • 1/2 cup whole wheat bread crumbs
  • 2 eggs
  • seasoning (whatever you want). I used a little salt, pepper, paprika and garlic powder

Directions:


1. Cut ends off of the onion and then slice into 1/2 inch wide sections. Remove each ring from the sections and place in cold water for 5 minutes or so.
2. Preheat oven to 450ºF.
3. Rinse onions and shake dry. Place in bowl with flour, shake off excess, then dip in egg and dredge through bread crumbs. Shake off excess. Place on the greased baking sheet.

4. Heavily spray with cooking spray and bake for 7-8 minutes. Flip each onion ring over and bake for another 5-6 minutes. I gave the tops a spray when I flipped them too.
See, sounds pretty easy doesn't it? They were really good, but cool off quickly so I would plan to serve immediately.

Enjoy!

Friday, May 25, 2012

English Parmesan Thyme Crackers

As you know by now, I love me some Food Network and Barefoot Contessa! Well, I scored this recipe from the same cookbook my hubby gave me for our anniversary. I made these for a party and received rave reviews! They are so flavorful and have such a unique taste. If you like a cheese straw, you are going to love these! The thyme gives these such a different flavor. It’s hard to describe how yummy these are, you just need to make them! They will be a great addition to your party treats.....or just to munch on at home. Don’t think I’ll judge you if you just want to make them and eat them yourself. They are so yummy, I might do that next time so I don’t have to share!
Okay, here’s how you make them:

Ingredients

  • 1/4 pound (1 stick) unsalted butter, at room temperature
  • 4 ounces freshly grated Parmesan cheese (about 1 cup)
  • 1 teaspoon minced fresh thyme leaves
  • 1/2 teaspoon kosher salt
  • 1/2 teaspoon freshly ground black pepper (I’m going to use a little less pepper next time, maybe 1/4 t)
  • 1 1/4 cups all-purpose flour


    Directions

    In the bowl of an electric mixer fitted with the paddle attachment, cream the butter for 1 minute. With the mixer on low speed, add the Parmesan, thyme, salt, and pepper and combine. With the mixer still on low, add the flour and combine until the mixture is in large crumbles, about 1 minute. If the dough is too dry, add 1 teaspoon water. I’ve had to add the water both times I made this so just go ahead and add it.
    Dump the dough onto a floured board, press it into a ball, and roll into a 9-inch log. Wrap in plastic and refrigerate for at least 30 minutes or for up to 4 days.

    After the dough is chilled, preheat the oven to 350 degrees F. Cut the log into 3/8-inch-thick rounds with a small, sharp knife and place them on a sheet pan lined with parchment paper.

     Bake for 22 minutes, until very lightly browned. Rotate the pan once during baking. Cool and serve at room temperature. Makes 24 crackers.
    This was such a quick and easy recipe. You'll be addicted once you make them and you'll never want regular cheese straws again.
    Since they are English crackers, enjoy with a cup of tea!

Wednesday, May 23, 2012

Super Easy Parmesan Risotto

OMG, you aren’t even going to believe how easy it is to make this risotto recipe! I love, love, love risotto, but never made it because I don’t have the patience to stand over it, constantly stirring. Well, wait no more people! This is your lucky day!  No constant stirring in this recipe. Yes, you heard me correctly. You do NOT have to stand over this and stir. It starts with the rice, chicken stock and dutch oven. Stick it in the oven and walk away. How easy does that sound?? You guys are so lucky that I watch a ton of the Food Network these days and can find these fabulous and easy recipes for us to try. I saw one of my friends, Barefoot Contessa, make this earlier  this week and could not wait to give it a try.  My husband is my official kitchen tester and he says this is one of the most flavorful dishes I’ve made yet. I think I’ve made some pretty tasty dishes lately so you should know that he is giving this dish super props!

I’m sure you are dying to know how I made it so here we go.....

Ingredients

  • 1 1/2 cups Arborio rice
  • 5 cups simmering chicken stock, preferably homemade, divided
  • 1 cup freshly grated Parmesan cheese – make sure it’s not the cheese in the jar, use freshly grated. It makes a difference.
  • 1/2 cup dry white wine
  • 3 tablespoons unsalted butter, diced
  • 2 teaspoons kosher salt
  • 1 teaspoon freshly ground black pepper
  • 1 cup frozen peas
  • 1 small package fresh mushrooms
  • 15-20 medium frozen shrimp, thawed

Directions

Preheat the oven to 350 degrees.


Place the rice and 4 cups of the chicken stock in a Dutch oven. Cover and bake for 45 minutes, until most of the liquid is absorbed and the rice is al dente. I checked on mine at 40 minutes and it was done.


While rice is cooking in the oven, sauté your mushrooms and set aside. I sautéed them lightly in just a little butter (no additional seasoning) and removed with a slotted spoon.


Remove rice from the oven, add the remaining cup of chicken stock, the parmesan, wine, butter, salt, and pepper, and stir vigorously for 2 to 3 minutes, until the rice is thick and creamy. Add the peas, mushrooms and shrimp, and stir until heated through. Serve hot.


Serves 4-6 (depending on how hungry you are!)


I think I’ll mix it up next time and try it with some pancetta. Yummy, right?


Make this.....seriously, do it very soon!

Tuesday, May 22, 2012

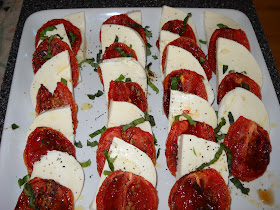
Roasted Tomato Caprese Salad


My hubby gave me one of the Barefoot Contessa’s cookbooks for our 15th anniversary earlier this month. Don’t worry, I actually wanted it and he gave me a few more gifts so it was fine. I immediately flipped through it looking for recipes and found this one. I was having a party that next weekend so it was perfect timing!  You’ll learn a few things about my strange food issues on this blog, but I’ll try to hide most of them from you. One small one is that I LOVE tomatoes.....well, I love them in every form except their raw state. You can stew ‘em, you can fry ‘em, you can squeeze ‘em into a ketchup bottle or cook ‘em up in sauce and I’ll love them, but raw, not so much. I’ve always thought a caprese salad was so pretty, but could never eat it because of the icky raw tomatoes. Well, the Barefoot Contessa practically saved my life with this recipe! A caprese salad with COOKED tomatoes! How awesome is that?? VERY, that’s how awesome! I couldn’t wait to make it and share it on my blog so here’s the recipe.


Ingredients:
12 plum or roma tomatoes, halved lengthwise, seeds (not cores) removed
1/4 cup olive oil, plus more for drizzling
1 1/2 T balsamic vinegar
2 large garlic cloves, minced
2 t sugar (I didn’t used all of it and just lightly sprinkled)
1 1/2 t salt 
1/2 t fresh ground pepper
16 ounces fresh mozzarella
12 fresh basil leaves, julienned

Directions:
Preheat oven to 275 degrees.
Arrange tomatoes on a sheet pan, cute sides up, in a single layer (as shown). Drizzle with the olive oil and balsamic vinegar. Sprinkle with the garlic, sugar, salt and pepper.  Roast for 2 hours until the tomatoes are concentrated and begin to caramelize. All tomatoes to cool to room temperature.

Okay, so here’s the scoop on the tomatoes.....one of my dear friends, the Barefoot Contessa, told me about this recipe, but I’m pretty sure you could cook these tomatoes in less time. She has a recipe for roasted tomatoes which is VERY similar, however they are cooked at 450 for 25-30 minutes. I’m pretty sure that would work too. I haven’t tried it yet, but I will and come back and update this recipe.

Cut the mozzarella into slices slightly less than 1/2 inch thick. If the slices of mozzarella are larger than the tomatoes, cut the mozzarella slices in half. Layer the tomatoes alternately with the mozzarella slices on a platter and scatter the basil on top. Sprinkle lightly with salt and pepper and drizzle lightly with olive oil. Serve at room temperature.

These were gobbled up at my party! Everyone loved them. Such a pretty presentation and quite tasty to boot.

Enjoy!

Sunday, May 20, 2012

Bite Size Apple Pies - Delish!

One thing I might love more than blueberries is apple pie! Make them individual size and I am in heaven. You can just pop these little jewels in your mouth one after another. That makes them pretty dangerous in my house! I just made these, but I don’t think I’m going to tell you how many I “sampled” to make sure they were tasty enough to serve. By the way, they WERE tasty enough to serve to my guests.

These were so easy and fun to make and even more fun to eat.....especially when they are hot fresh out of the oven. Yummy! **Caution, filling will be hot.....didn’t want you to sue me for not telling you that before you took a bite. lol**

The first time I made these I didn’t peel the apples, but it made them a little difficult to bite without the apple sliding out. This time I peeled the apples and liked it much better. They weren’t as colorful, but a lot easier to eat, which is the main point, right??

Let’s get down to the details. I know you’ll want to make these and instructions will be very helpful.

Ingredients:
1/2 c. sugar
2 tsp. cinnamon
1 pkg. crescent rolls
3 tbsp. melted butter, divided
2 medium tart apples, each cut into 8 wedges


Directions:

In a small bowl, combine the sugar and cinnamon, set aside 1 Tbsp. On a lightly floured surface, unroll the crescent roll dough. Brush with  2 Tbsp. melted butter, sprinkle with sugar mixture. I worked with half of the package at a time.


Cut each individual crescent section in half so that you’ll have 16 pieces.  Dredge each apple slice in the cinnamon sugar mixture. Then wrap one strip around each apple wedge, placing sugared side of pastry against apple.


Place on parchment paper lined baking sheet. Brush tops with melted butter and sprinkle with remaining sugar mixture. Bake at 425 for 13-15 minutes or until pastry is golden brown. Serve warm. Makes 16.


Great served with a scoop of ice cream on the side or some warm caramel sauce drizzled over the top. I've served them both ways and haven't had a complaint yet!
When you make these, be sure to come back and tell me how you liked them or if you made any changes.
Enjoy!

Thursday, May 17, 2012

Spinach & Cheese Bruschetta

Thank Goodness for the Food Network and my friend, Giada! I was watching yesterday, as I do every afternoon, and Giada made the most awesome bruschetta. Well, if you like spinach you’ll think it’s awesome, if not, you might be making a face right now. Trust me, this was very tasty and a very unique take on bruschetta. I used to be a picky eater and would be making a face too, but now I eat greens and really like them. I feel like a grown up. And since I’m a grown up, I can actually cook the yummy dishes that I see on the Food Network. My mama and daddy are so proud that I finally grew up and decided that vegetables are actually quite yummy! 
How could I not like greens, this bruschetta looks pretty tasty, right? This is a closer pic so you can see how yummy it really looks.
As I was saying, one of my bffs, Giada, was whipping up this interesting bruschetta and it looked pretty easy so I decided to give it a try. She just sautéed a little garlic in EVOO, threw in some spinach, put it on bread, topped with cheese and baked. Sounds pretty easy, right? Well, I’ll give you the official directions so you can make it too. I made this for two so I cut back the total amounts by more than half. You can change as you see fit, but here are the full, official directions.

Ingredients

Toasts:

  • 1 (1-pound) loaf ciabatta bread, trimmed and cut into 14 (1/2-inch thick) slices (I used 4 slices of a whole grain french loaf that I already had. You can used whatever floats your boat)
  • Extra-virgin olive oil, for drizzling
  • 1 garlic clove, halved

Topping:

  • 3 tablespoons extra-virgin olive oil
  • 3 cloves garlic, minced
  • 1/4 teaspoon crushed red pepper flakes
  • 12 ounces (12 cups) baby spinach (I used about 4 cups for two people)
  • Kosher salt
  • 2 cups (4 ounces) shredded fontina cheese (I don’t happen to keep fontina cheese on hand, so I used parmesan and mozzarella. I just sprinkled on top until I thought it was enough)

Directions

For the toasts: Put an oven rack in the center of the oven. Preheat the oven to 400 degrees F. Line a baking sheet with parchment paper. (P.S. – I didn’t use parchment paper either) 


Arrange the bread slices in a single layer on the baking sheet and drizzle with olive oil. Bake until light golden, about 10 minutes. Cool for 2 minutes. Rub the warm toasts with the cut side of the garlic. Set aside.


For the topping: In a large skillet, heat the oil over medium-high heat. Add the garlic and red pepper flakes and cook until the garlic is fragrant, about 30 seconds. Add 1/2 of the spinach and stir until it begins to wilt, about 2 to 3 minutes. Add the remaining spinach and cook until wilted, about 2 minutes. Season with salt, to taste. Using tongs, arrange the spinach on top of the toasts. Sprinkle with cheese and bake for 5 to 8 minutes until the cheese is melted and bubbling. Season with salt and cool for 2 minutes.


Transfer to platter and enjoy!

Wednesday, May 16, 2012

Lemon Blueberry Muffins


I’m addicted to blueberries, I’ll admit it! After making the best pound cake EVER (see Blueberry Lemon Pound cake recipe) I had to find something else to make with blueberries, and a little hint of lemon didn’t hurt either! So of course, I went to Pinterest! Seriously, get on there and check out the recipes. I have found some great dishes that I’ve found pinning. Some how, some way I came across the recipe below which is actually from a magazine. What recipes are original anyway, right?  Also since my husband and I have been trying to eat a little healthier (don’t judge me by my truffles and pound cake) I decided to adjust this one a little bit and try to make it a little healthier, but still delicious. These muffins were so stinking delicious! I’m not even kidding! So full of blueberries and flavor. My changes didn’t take a bit of flavor out so why waste the calories? So yummy, make them! 


Here’s the recipe with my adjustments are noted. I didn’t make the glaze (extra calories), but I’ve included the recipe with that in case you want the extra calories. 


Lemon Blueberry Muffins
Source: Simple and Delicious Magazine via Pinterest


1/2 cup butter, softened (I used light butter)
1 cup sugar (I changed to 1/2 c splenda, 1/2 c sugar)
2 eggs
1/2 cup 2% milk
2 tablespoons lemon juice
2 teaspoons grated lemon peel

2 cups all-purpose flour (I used 1/4 c wheat and 1 3/4 all purpose)
2 teaspoons baking powder
Dash salt
2 cups fresh or frozen blueberries (I used frozen)


GLAZE: (Optional)
1-1/2 cups confectioners’ sugar
2 tablespoons lemon juice
1 teaspoon butter, melted
1/4 teaspoon vanilla extract


Directions:


In a large bowl, cream butter and sugar until light and fluffy. Add eggs, one at a time, beating well after each addition. Beat in the milk, lemon juice and peel. Combine the flour, baking powder and salt; add to creamed mixture just until moistened. Fold in blueberries. How delicious does this batter look?

By the way, the batter was delicious, I practically licked the bowl! Okay, fine, I actually DID lick the bowl.


Fill paper-lined muffin cups three-fourths full or just grease your muffin tins with cooking spray. I was out of muffin cups so I just sprayed them well and they came out fine. 

Bake at 400° for 25-30 minutes or until a toothpick inserted in muffin comes out clean. I cooked mine for about 22 minutes so start checking after 20 minutes. Cool for 5 minutes before removing from pan to a wire rack. The directions asked me to wait 5 minutes and cool on a rack, but I popped that muffin in my mouth after about two minutes and it was soooooooo delicious!


Look at the inside of that muffin, how could I wait?? The amount of blueberries is ridiculous! So yummy. I'm going to go eat one now.


For glaze: In a small bowl, combine the confectioners’ sugar, lemon juice, butter and vanilla; drizzle over warm muffins.


Give this recipe a try, you won’t regret it!

Sunday, May 13, 2012

Chocolate Truffles


I did it! I made truffles!!! I couldn’t believe it, but I am actually a chocolatier. Who knew I was a chef and a chocolatier?? Well, I sure didn’t and neither did my husband. He does not appreciate me keeping this secret for so long either. Especially now that he’s on a diet and recently lost 40 pounds. He wants to know where his truffles were when he was a chunky monkey and could eat a whole batch! Luckily I didn’t make these just for us to munch on. I made these for a girls night at my house and I am happy to report that they were a big hit! I only had a few left, thank goodness.

Wanna know how I made them?? It wasn’t that hard, but it was time consuming and a little messy.....okay, a lot messy.

Ingredients:
8 ounces good quality bittersweet chocolate (I used Ghirardelli for all)
8 ounces good quality semisweet chocolate
one 14 ounce can sweetened condensed milk
8 ounces meltable milk chocolate (I used Bakers in the microwavable cup – see photo below)

Directions:
Heat dark chocolates and condensed milk in a double boiler over medium-low heat until chocolate is melted and mixture is smooth.
If you don’t have a double boiler, don’t worry, find a glass or ceramic bowl that can be heated and put in pot over water (see picture above). Make sure you have enough room between water and bowl. The bowl should not be touching the water.  I made my own fancy double boiler and it worked just fine. When the mixture is melted, it will have a slight marshmallow texture.

At this point, before you take it off the heat, if you want to make the truffles mint chocolate, you could add 3-4 drops of mint extract. I personally don’t like mint and chocolate so I would never voluntarily add mint to my chocolate!  But hey, feel free to if you want to ruin the taste of perfectly delicious chocolate truffles.

Remove the bowl from the heat, cover and refrigerate until completely cool, at least 2 hours.

Once chilled, roll in teaspoon-sized balls, and then dip into the melted chocolate coating, using a fork to let the excess chocolate drip off. You might want to use two forks and pass back and forth like I did.

I also went ahead and rolled all of the filling before I started dipping so I could get the assembly line ready.

As you see in the photo, I used the Baker’s metlable milk chocolate for the dipping, but I also used the remaining dark chocolate chips, melted in a bowl in the microwave and dipped a few in truffles in dark chocolate too.
The truffles look beautiful enough and you should be proud of your accomplishment, but I wanted to add a little decorative finish so I could feel like a real chocolatier!  Which I totally am, by the way. I used some of the dark chocolate I melted previously, used a fork for dipping, and drizzled the dark chocolate over a few of the milk chocolate truffles. As you can see, I also melted a little white chocolate and did the same. I thought it added a nice touch, what do you think?
This recipe will make 45-50 truffles, depending on the size. I made some really big ones and a few that were too small, but it all evened out.

Now here’s the trick to storing: I looked it up online and had several sources confirm that they could be stored in the refrigerator so I did it.....but I wish I didn’t. I left them in over night and pulled them out the next morning. They were really hard and some of the chocolate had the spotted look that refrigerated chocolate sometimes gets. Well, I was having a party that night and was not happy about this. Especially after all the hard work and time I had put into the truffles. Luckily, I left them out all day and by that night they were back to room temp and all was well. It might be okay to put them in the fridge for an hour or so just to set the outside coating, but I won’t leave them in overnight or for many hours at all next time. Lesson learned.

Enjoy!
Dawn, expert chocolatier

Thursday, May 10, 2012

Lemon Blueberry Pound Cake = Heaven!

Holy Smokes, this is a delicious cake!!! I’m not even kidding. It is so dang good! I won’t say that it will make you want to slap someone, but you know I’m thinking it. I’m from Georgia and love anything Georgia. (I left my heart in Dixie) I found this recipe in a “Welcome to GA” magazine at a rest stop on one of our trips back and forth from VA to GA. It’s from Georgia’s number one tea room (so they said, but I've never been there so how great can it be??), The Potted Geranium in Greensboro, GA. I’ve had the magazine a while and decided to thumb threw it the other day and came across this recipe. Boy am I glad I did. I’m having girlfriends over tomorrow night and they’ll all get to sample this new goldmine I found. Of course, my husband and I had to go ahead and sample it. I wouldn’t want to serve bad food to my friends. I’m a giver like that. This was so delicious right out of the oven. I didn’t even wait to dust it with powdered sugar, it didn’t need it. If you are looking for a new cake recipe, THIS IS IT!!

Here you go, let's get started on the details.
Ingredients:
3 cups all purpose flour
1/2 t baking soda
1/2 t salt
1 cup butter
3 Tablespoons lemon zest
2 cups sugar, divided
6 large eggs, separated
1 teaspoon vanilla extract
8 ounces sour cream
1 pound frozen blueberries, tossed with 1 T flour
powdered sugar for dusting

Directions:
Preheat oven to 350 degrees. Grease and flour a large Bundt pan and set aside.
Sift together flour, baking soda and salt; set aside.
Cream together butter, lemon zest and 1 3/4 cup of sugar (reserving 1/4 c) at medium-high speed  until light and fluffy. Add egg yolks, 2 at a time, beating just until blended after each addition. Add vanilla, and beat to incorporate.  Add flour mixture to butter mixture alternately with the sour cream, beating at low speed, beginning and ending with flour mixture. My friend, Paula Deen, says if you start and finish with your dry ingredients that you’ll have a fluffy batter and I always do what Paula says. I mean, if someone can do THAT much with butter and bacon, she must be pretty smart. Set this mixture aside.
In second mixing bowl, beat egg whites at high speed with an electric mixer until foamy.
 
Gradually add remaining 1/4 c sugar, beating until stiff peaks form. I finally added pictures so you could see the stiff peaks and how these steps should look.
 
 
 Fold a third of the egg white mixture into cake batter. Fold in remaining egg whites until almost incorporated; carefully fold in blueberries. Doesn't that batter look delicious?? BTW, it tastes delicious too!


Pour into Bundt pan.
Bake at 350 for 1 hour and 15 minutes or until toothpick comes out clean. I only baked 1 hour so check after an hour.

Cool in pan on wire rack for 10 minutes. Turn cake out on wire rack over sheet pan. Allow to cool completely.  Serve with dusting of powdered sugar.
Like I said, I didn’t wait on dusting with powdered sugar. This cake is so pretty after it’s sliced, if you are having guests over, slice it first. It makes a much better presentation that way.  Enjoy!!

Tuesday, May 8, 2012

Mac & Cheese Please!

What’s a better comfort food than macaroni and cheese?? I can’t think of any. Combine this with my Gorgonzola Meatloaf and you are back to wanting to slap somebody it’s sooooooo good. Yummers!  This recipe is so cheesy and creamy and yummy. I just can’t think of a word that doesn’t end in Y to describe it. My husband loved the crunchy topping that the bread crumbs added to this already delicious dish. I know it’s kind of hard to make mac and cheese healthy and I’m not claiming this is a healthy dish, but I did make a few changes to the recipe I found online to make it a little healthier. Every calorie counts, right? Plus my changes make me feel a little better about going back for seconds! Here’s my version along with a picture of the finished product. Looks tasty, right?

Ingredients

  • 1 1/2 cups uncooked whole grain rotini
  • 5 tablespoons butter, divided
  • 3 tablespoons all-purpose flour
  • 1/2 teaspoon salt
  • 1/4 teaspoon pepper
  • 1 1/2 cups milk (I used skim milk)
  • 1 cup shredded Cheddar cheese
  • 2 ounces processed cheese food (I used light Velveeta – I know, light Velveeta sounds ridiculous, but it does exist), cubed
  • 2 tablespoons dry bread crumbs (I changed up to whole wheat bread crumbs)

Directions

Cook pasta according to package directions. Meanwhile, in a saucepan, melt 4 tablespoons butter over medium heat. Stir in flour, salt and pepper until smooth. It will be very thick. Gradually add milk. Bring to a boil; cook and stir for 2 minutes or until thickened. Reduce heat. Add the cheeses, stirring until cheese is melted.
Meanwhile drain pasta.  Transfer to a greased 1-1/2-qt. baking dish. Pour cheese sauce over macaroni; mix well.
Melt the remaining butter; add the bread crumbs and mix together. Sprinkle over top. Bake, uncovered, at 375 degrees F for 30 minutes or until heated through and topping is golden brown.
And here it is ready to go in the oven, before it bubbled and dirtied up my pan.
Make it, you won't be disappointed.

Sunday, May 6, 2012

Skillet Lasagna

Who doesn’t love lasagna?? If you are reading this blog and don’t even like lasagna (not mention “love”), stop reading immediately! You might want to go find a vegan blog or one that writes about boring food. This blog is NOT for you! This blog is for food lovers and appreciators of delicious, easy to make dishes and skillet lasagna happens to be one of them.  Skillet lasagna is super easy, cooks on the stove top and will send your family back for seconds! How yummy does this look???

I saw this being prepared on the Today Show and thought I needed to give it a try. I made a few changes, but here’s my finished product. I think you’ll love it! Of course, I tried to make it a little healthier by using ground turkey and whole wheat pasta. Every little bit helps right?? At least that's what I keep telling myself!
Ingredients
  • 1 (28-ounce) can diced tomatoes (I always use the ones with basil, oregano and/or garlic for extra flavor)
  • Water
  • 1 tablespoon olive oil
  • 1 medium onion, diced
  • Salt & Pepper
  • 3 garlic cloves, minced
  • 1/8 teaspoon red pepper flakes
  • 1 pound ground beef or turkey 
  • 10 curly-edged lasagna noodles, broken into 2-inch lengths (I used whole wheat pasta)
  • 1 (8-ounce) can tomato sauce
  • 1/2 cup plus 2 tablespoons grated Parmesan cheese
  • 1 cup ricotta cheese
  • 3 tablespoons chopped fresh basil
  • 1 tablespoon Italian seasoning (or more to taste)
Preparation
Use a 12-inch nonstick skillet with a tight-fitting lid for this recipe.
To prepare: Pour tomatoes with their juices into a 1-quart liquid measuring cup. Add water until mixture measures 1 quart.
Heat oil in large nonstick skillet over medium heat until simmering. Add onion and 1/2 teaspoon salt and cook until onion begins to brown, about 5 minutes. Stir in garlic and pepper flakes and cook until fragrant, about 30 seconds. Add ground meat and cook, breaking apart meat, until no longer pink, about 4 minutes.
Scatter pasta over meat but do not stir.

Pour diced tomatoes with juices and tomato sauce over pasta and sprinkle with Italian seasoning.

Cover and bring to simmer. Reduce heat to medium-low and simmer, stirring occasionally, until pasta is tender, about 20 minutes. If you use whole wheat pasta, you might need to cook 10 minutes longer (I did).
Remove skillet from heat and stir in 1/2 cup Parmesan. Season with salt and pepper. Dot with heaping tablespoons ricotta, cover, and let stand off heat for 5 minutes.

 Sprinkle with fresh basil and remaining 2 tablespoons Parmesan. Serve. So easy and so delicious!!

Thursday, May 3, 2012

Seriously Good Braised Chicken

Thank God I’m unemployed and have plenty of time to watch my friends on the Food Network! They give me wonderful ideas. I wonder if my future employer will mind if I watch a few hours of my friends, Giada, Guy and Ina, during the day. I’ll bring that up during my next interview. I’m sure they’ll be flexible. I’m willing to give up my time with GMA and Kelly so they should give up something too, right??
My friend, Giada, taught me how to make braised ribs and they have been a big hit around here, so I was thinking, what else can I prepare the same way? Well, thank goodness I’m practically a restaurant chef and came up with chicken thighs! We love the thighs because they are juicy and flavorful, but you could certainly use breasts or whatever you choose.  Now let’s get down to making my Braised Chicken.
Oh also, you’ll need a Dutch oven for this recipe. Giada told me  how much I needed one and she’s never led me astray!
Let's get started.....Put a little olive oil in the bottom of the Dutch oven, add the chicken and brown a few minutes on each side. When nicely browned remove chicken temporarily.
Now add the chopped veggies:
  • 2 ribs celery
  • 3-4 carrots
  • 1 med onion
  • 1-2 tomatoes, I only had one this time


Add more olive oil to the veggies if needed. I usually need a touch more. After the veggies have softened add 2 cloves of minced garlic and 2 T of tomato paste. If you haven’t found the tomato paste in the tube (like toothpaste), you don’t know what you are missing. It’s awesome. Just squeeze out what you need and stick the tube back in the fridge. Look for it!
After veggies are soft and you’ve added garlic and tomato paste, stir and let cook a minute or so, then deglaze with a little red wine. Just pour in about 1/2 c of red wine and get all the yummy bits off the bottom of the pan.
Now add the following:
a touch of red pepper flakes (about 1/4 t)
2 bay leaves
1 bunch of fresh thyme (about 5 sprigs)
1 sprig of fresh rosemary
Place the chicken back in the pan and pour chicken stock about half way up the meat. Of course, I had some homemade stock on hand. It really is more flavorful.
Bring to a simmer on the stovetop, then cover and put in a 350 degree oven and cook 1 1/2 hours. If you use larger chicken pieces (like breasts), you might need to cook for a few more minutes.
Take out and enjoy! No need to make any sides, everything you need is in the pot! Be sure to use some of the broth, it is so delicious. You might want to serve with rice just so you can pour on top! Yes, it is THAT good!!
Here's the finished product.....yummers!